Biology Dept
Kenyon College
|
Slonczewski
Biology Dept Kenyon College |
by Joan L. Slonczewski and Chris Kirkpatrick
Revised June 6, 2001
As bacterial genomes are completed, new approaches to identify gene expression have been devised. Global approaches reveal patterns of coordinate expression of numerous genes. The major global approaches are DNA microarray analysis of transcription of the genome, and two-dimensional gel electrophoresis (2-D gels) of proteins in the "proteome," the total protein content expressed by a genome. The excitement of genomic and proteomic methods is that they may reveal particular genes and proteins whose expression might not have been tested under prevailing assumptions.
The 2-D gel analysis of proteins was developed by OFarrell and pursued
extensively by Neidhardt, VanBogelen and colleagues to explore stress response
in Escherichia coli. Recent advances in gel technology and protein
identification, coupled with the availability of genomic sequence, have
increased the attractiveness of 2-D gels and made the technique accessible
even to small laboratories such as our own. Here we present the current
working procedure which prove most fruitful in our laboratory.
Escherichia coli. E. coli W3110 is cultured in modified Luria Broth with 100 mM KCl replacing NaCl (LBK), to avoid the toxicity of sodium ion in cultures grown at high pH. For 1 L add 10 g of Tryptone, 5 g of Yeast Extract, 7.45 g of KCl, and one or more pH-appropriate sulfonate buffers totaling 100 mM (Table 1), pH adjusted with KOH. Sulfonate buffers are preferred to amine-based buffers such as Tris, whose deprotonated form can cross the cell membrane and penetrate the cell. Bring to volume in double distilled water and filter sterilize.
We now filter-sterilize all media, and pipet into sterile glassware just before inoculation. This avoids possible break-down of the buffers during autoclave. For aerobic growth, we pipet 20 ml medium into a pre-sterilized 250-ml baffled flask, using rotary shaking. For anaerobic growth, 20 ml medium per screw-cap tube, leaving small head space; rotate slowly in a vertical rotator.
Minimal Medium (M63): For 1 L add 3 g KH2PO4, 7 g K2HPO4, 2 g (NH4)2SO4, 0.5 ml 1mg/ml FeSO4, 2 ml 0.5M MgSO4, 20 ml 1.5M Glycerol, 20 ml 5mg/ml Thiamine, and pH-appropriate sulfonate buffer at 100 mM total. Bring to volume in double distilled water and filter sterilize. Overnight cultures of 2 ml per test tube are diluted 200-fold into 15 ml per 125 ml flask; to obtain early log-phase growth, 1000-fold dilution is preferred.
Helicobacter pylori. For results, see Helicobacter pH-dependent proteins. H. pylori 26695 is grown in buffered yeast tryptone medium (HPYT, Ref. 10) or on Brucella agar plates under oxygen regulation (T. Seyler and J. L. Slonczewski, unpublished). The advantage of growth in liquid HPYT medium is that the cell density can be controlled. The advantages of plate growth is that cultures appear healthier, showing cleaner protein content; and that oxygen concentration can be better controlled.
Table 1: Sulfonate Buffers
| Buffer |
|
|
|
|
|
|
|
|
| HOMOPIPES | Homopiperazine-N,N?-bis-2(ethanesulfonic acid) |
|
|
| MES | 2-(N-Morpholino)ethanesulfonic acid |
|
|
| PIPES | Piperazine-N,N?-bis(2-ethanesulfonic acid) |
|
|
| MOPS | 3-(N-Morpholino)propanesulfonic acid |
|
|
| TES | N-[Tris(hydroxymethyl)methyl]-2-aminoethanesulfonic acid |
|
|
| TAPS | N-[Tris(hydroxymethyl)methyl]-3-aminopropanesulfonic acid |
|
|
| CAPSO | 3-(Cyclohexylamino)-2-hydroxy-1-propanesulfonic acid |
|
|
| CAPS | 3-(Cyclohexylamino)-1-propanesulfonic acid |
|
|
All buffer stock solutions are 0.5M and sterilized by filtration.
The following procedure is based on Genomic Solutions, bacterial protein sample preparation, developed by Ruth VanBogelen. Make up the following three Sample Buffers and freeze away in aliquots for use. Note: urea needs to be exceptionally fresh during buffer preparation, in order to avoid deleterious reactions with protein.
Sample Buffer 1. 0.3% (w/v) Sodium Dodecyl Sulfate (SDS), 200 mM Dithiothreitol (DTT), 28 mM Tris-HCl, 22 mM Tris base, and 18 megohm-cm water. Aliquot the mixture to 1 ml volumes and store at -80ºC.
Sample Buffer 2. 24 mM of a 1.5 M Tris base stock, 476 mM of a 1.5 M Tris-HCl stock, 50mM of a 1.0 M MgCl2, 1 mg/ml DNAse I, 0.25 mg/ml RNAse A, and 18 megohm-cm water. Mix the water and first three reagents and chill on ice before adding the DNAse I and RNAse A. Aliquot the mixture to 100 ml volumes and store at -80ºC.
Rehydration Solution: 8.0 M Urea, 2.0% (w/v) CHAPS, trace amounts
of Bromophenol blue, and 18 megohm-cm water. Aliquot the mixture to 2.5
ml and store at -20ºC. DTT and IPG Buffer are added just prior to
use. Add 7 mg of DTT and 12.5ml IPG Buffer (same
pH range of the IPG strip) per 2.5 ml aliquot of rehydration stock solution.
| For tube gels replace Rehydration Solution with Sample Buffer 3. 9.9 M Urea, 4.0% (v/v) Triton X-100 or NP-40, 100 mM DTT, and 18 megohm-cm water. Mix the first four reagents, then add the water to approximately 90% of the total volume. Dissolve the Urea, not allowing the solution to warm above 37ºC. Add the remaining water, then filter and aliquot in 1 ml volumes. Note: the Urea in Sample buffer 3 does not dissolve readily. |
To prepare proteins:
Reagents. Rehydration Solution: 8.0 M Urea, 2.0% (w/v) CHAPS, trace amounts of Bromophenol blue, and 18 megohm-cm water. Aliquot to 2.5 ml and store at -20ºC. Just prior to use add 7 mg of DTT and 12.5ml IPG Buffer (same pH range of the IPG strip) per 2.5 ml aliquot of rehydration stock solution.
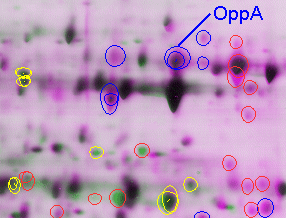
For the IPGphor immobiline strip, there are a range of choices. We find that the range of pH 4-7 covers a majority of the proteins of interest in E. coli, and is the best choice for beginning investigations. For H. pylori, however, a greater proportion of alkaline proteins are present; we therefore use the nonlinear pH 3-10 range. The nonlinear gradient spreads out proteins in the range of pH 4-7, where the majority of proteins still appear, but also enables visualization of proteins up to pI = 9 or 10 (Fig. 2).
Procedure.
Buffers and Reagents. 4x Resolving Gel Buffer (1.5 M Tris-Cl pH 8.8): 1.5 M Tris base, 18 megohm-cm water, and HCl as needed. Add the water to ¾ total volume and adjust the pH to 8.8 using HCl. Add remaining water and filter purify. Store at 4ºC.
SDS equilibration buffer: 50 mM 4x Resolving Gel Buffer, 6 M Urea, 30.0% (v/v) Glycerol, 2.0% (w/v) SDS, trace amounts of Bromophenol blue, and 18 megohm-cm water. Aliquot to 25.0 ml and store at -20ºC. Just prior to use add 0.25 g DTT.
1.5 M Tris Blend: 190.8 g TRIZMA Pre-set Crystals (Tris[hydroxymethyl]amino-methane and Tris hydrochloride) pH 8.8 (Sigma), in 1 L 18 megohm-cm water.
10x Tris/Gly/SDS Running Buffer: 10 g SDS, 30.28 g Tris base, 144.13 g Glycine, and 18 megohm-cm water to 1 L. Genomic Solutions sells buffer pre-made.
Slab Solution (11.5% acrylamide): 465 ml Duracryl (Genomic Solutions), 300 ml 1.5 M Tris blend, 436 ml 18 megohm-cm water, 12.3 ml 10% SDS, 0.618 ml TEMED (Genomic Solutions), 3.04 ml of fresh 10% APS (Genomic Solutions).
Top Chamber Running Buffer: 2 L 18 megohm-cm water and 250 ml 10x Tris/Gly/SDS running buffer
Bottom Chamber Running Buffer: 10 L 18 megohm-cm water and 1.1 L 10x Tris/Gly/SDS running buffer
Procedure.
The following procedure is modified from Pharmacia Biotechs Silver Staining Kit, and from Yan et al (2000).
Reagents. Fix: 800 ml 95% ETOH, 200 ml Glacial Acetic Acid, and 1 L 18 megohm-cm water to a 2 L flask.
Sensitizing Solution: 600 ml 95% ETOH, 80 ml 5%(w/v) Sodium Thiosulfate,
136 g Sodium Acetate, and 18 megohm-cm water to 2 L. Add
10 ml 25% (v/v) Gluteraldehyde just prior to use. Omit
glutaradehyde.
Silver Stain: 0.75 g Silver Nitrate to 300 ml 18 megohm-cm water.
Repeat this for as many gels to be stained. Add
120 ml 37% (v/v) Formaldehyde just prior to
use. Omit formaldehyde.
Developing Solution: Add 7.5 g Sodium Carbonate to 300 ml 18
megohm-cm water. Repeat this for as many gels to be stained. Add 60
ml
120 ml 37% (v/v) Formaldehyde just
prior to use
Stop Solution: 29.2 g Disodium Ethylenediamine Tetraacetate (EDTA) to 2 L 18 megohm-cm water.
Preserve Solution: 450 ml 95% ETOH, 69 ml 87% (v/v) Glycerol, and 981 ml 18 megohm-cm water.
Procedure.
Coomassie Blue stain is an alternative to Silver Stain. Although less sensitive than silver stain (revealing about a third as many proteins), it does stain some proteins that silver stain misses altogether.
Reagents. 100% TCA (Trichloroacetic acid): Add 210 ml 18 megohm-cm water to a 500 g bottle of TCA. 2X Stock: For 4 L add 80.0 ml 100% TCA, 80.0 ml 0.5% Coomassie Blue, 600.0 ml Glacial Acetic Acid, and 18 megohm-cm water to 4 L.
Procedure.
To prepare proteins for N-terminal sequence identification, the gel
must be blotted onto a nylon membrane before staining. The membrane is
then stained with Coomassie Blue. The procedure below is based on
the Type II Investigator Graphite Electroblotter (Genomic Solutions).
Note: Silver stain can now be used to cut
proteins directly out of the gel for MALDI/TOF analysis. Western
blot is then unnecessary.
Buffers and Reagents.
Anode Buffer 1: 36.3 g Tris base, 100 ml Methanol, and 18 megohm-cm water to 1 L. Store at room temperature for up to 1 week.
Anode Buffer 2: 12.1 g Tris base, 100 ml Methanol, and 18 megohm-cm water to 1 L. Store at room temperature for up to 1 week.
Cathode Buffer: 3.03 g Tris base, 3 g 6-amino-n-caproic acid, 200 ml Methanol, and 18 megohm-cm water to 1 L. Store at room temperature for up to 1 week.
Coomassie Stain: 500 ml Methanol, 100 ml Acetic Acid, 1 g Coomassie Brilliant Blue R-250, and 18 megohm-cm water to 1 L.
Destain: 500 ml Methanol, 100 ml Acetic Acid, and 18 megohm-cm water to 1 L.
Procedure
To compare different growth conditions, the size of a given protein spot can be compared between patterns of protein spots from gels performed on samples grown under different conditions. In the older literature, a protein was considered to be "induced" if it appeared in two out of three gels from independently grown cultures of an experimental condition, compared with gels from a control growth condition. More recently, computer image analysis has been used to subtract background from the protein pattern, and normalize the spot pixel densities against the total protein density. This approach suffers from high errors associated with the background count, and from the skewing of total protein count by a few proteins whose high concentration overloads the relatively narrow range of image intensity available for current scanners; see for example the protein pattern of H. pylori, dominated by the greatly overloaded spots of UreB and GroEL. A complication often observed is the appearance of a given protein in several different spots, most commonly in a "train" of spots over a range of pI. The reasons for multiple spots remain unclear, although they probably arise from a combination of posttranslational modifications in vivo as well as chemical modifications that occur during sample preparation.
Currently, computer software such as Compugen Z-3 replaces background subtraction with a spot quantitation algorithm that is relatively insensitive to background and overexposure, as well as a normalization algorithm that compares the histogram of all proteins visualized between two gel patterns. By quantifying protein spots using pixel density, it is now possible to detect smaller differences that may have gone unnoticed otherwise. Furthermore, a large number of pairwise comparisons can be performed, enabling a level of statistical analysis not possible previously.
The gel images are loaded into Z-3 to be analyzed and made into layered views. We use three gels from independent cultures at each of two growth conditions, an experimental and a control; for example, cultures grown in the absence or presence of 50 mM D-lactic acid (Fig. 3). It is best to select gel images that exhibit comparable amounts of overall protein and intensity of stain, although Z-3 does compensate for modest differences and effectively normalizes the comparison between gels. Relative spot densities are computed by comparing the non-saturated pixels of the spot on each of two gels and fitting by linear regression. Normalization of overall protein content is performed by comparing the overall histograms of spot ratios across the entire gel.
Table 2 shows examples of typical differential expression ratios (DE values) for proteins from pairwise comparisons of gel images from two sets of three replicate cultures. Control gels are designated as gel 1 and experimental gels are designated as gel 2. We consider a protein to exhibit significant differential expression if its DE values are greater than 1.5 (50% induced) or less than 0.67 (30% repressed) for at least 7 of 9 control-to-experimental layered views. In Table 2, the protein in the first row is "unmatched," appearing only in the experimental condition; the second row shows a protein induced nearly four-fold; and the third row shows a protein repressed three-fold. The lower two rows show typical DE values of proteins with no consistent pattern of induction or repression.
Because expression values represent ratios between conditions, we perform logarithmic conversion and represent their distribution as the mean log10 (DE), or LDE, with standard deviation (see explanation below). Proteins induced in the comparative gel show a positive LDE; proteins repressed show a negative LDE.
Table 2. Differential expression ratios (DE values) for pairwise
comparisons of protein spot densities from reference gel images (1A, 1B,
1C) and comparative gel images (2A, 2B, 2C). The LDE = Mean log10
(DE).
|
ID No. |
|
|
|
|
|
|
|
|
|
|
|
|
|
|
|
Mean DE |
± SD (n=9) |
|
|
|
|
|
|
|
|
|
|
|
||||||||
|
|
|
|
|
|
|
|
|
|
|
|
|
||||||
|
|
|
|
|
|
|
|
|
|
|
|
|
|
|||||
|
|
|
|
|
|
|
|
|
|
|
|
|
|
|
||||
|
|
|
|
|
|
|
|
|
|
|
|
|
|
|
|
Um+ indicates spots on Gel 2 lacking a matching spot on Gel 1.Explanation of Differential Expression ratios (from Compugen)
DE is the differential expression ratio of the comparative to the reference spot density.
LDE is the average of the log10 of all spot densities.
The pixel densities are calibrated by setting the overall histogram of the proteins in the total image such that a maximum of DE values are close to 1 (equality), on the assumption that 90% of proteins have the same concentration in both cell samples. This method of calibration is a big improvement over "summing the whole gel," which is what most methods use. The DE is actually calculated by matching pixel by pixel between the spots on the two gels, plotting Gel 2 over Gel 1, then taking the slope of a fitted line. The benefits of using this method are that (1) it is more robust than summing each spot and taking a simple ratio, and (2) no background subtraction is needed.
Reporting protein expression ratios. Because DE values are ratios, the appropriate average measure is the geometric mean; that is, exponentiation of the mean logaritm values. However, we believe the induction and repression of proteins is best indicated by reportingpositive and negative mean log10 (DE) which we call LDE. Thus, a positive LDE = 1.00 represents a ten-fold increase of a spot in the comparative gel over the reference gel: for example, LDE=2.00, hundred-fold increase; -1.00, ten-fold decrease. [Note: The natural logarithm works as well, but log10 has the advantage of producing values in which each unit of 1 means a ten-fold increase.]
To determine the mean log10 DE:
Assume one has two groups of three gels (reference group 1 -- Gels
A, B, C; and comparative group 2 -- Gels A, B, C). One would like
to quantitate a protein's expression ratio between Gel 1(A, B, or C) and
Gel 2(A, B, or C), based on a set of pairwise DE ratios (values obtained
from pairwise comparisons of group 2 over group 1). There would be
a total of nine DE ratios.
Since ratios are not additive, one should use the geometric mean
and
not the arithmetic mean. Note, however, that the geometric mean is related
to the arithmetic mean of the log-ratios. Specifically, let DE1,
DE2, ... DE9 be the 9 ratios, then the geometric
mean of them can be expressed as:
[geometric mean of DE] = n-th root of the product
= 10 ^ [mean log10(DE )] = 10 ^ LDE
where "10^X" is ten raised to the power X, and "log10"
is the logarithm to the base ten.
LDE = Mean log10 DE = [ log10(DE1)
+ log10 (DE2) + .... + log10 (DE9)
] / 9
By taking the log10 of the ratios we can average them arithmetically. The inverse function (10^) of the LDE would generate the geometric mean.
Estimating Error (Standard Deviation). The standard deviation (SD) of log10(DE) can be taken simply based on the mean log10 (DE) and the individual log10(DE) values. We represent the distribution of the mean log10 (DE) as LDE +/- SD. (See Table 2 for typical results.)
The values can however be converted back to geometric mean by exponentiation:
Geometric mean = 10 ^ [mean log10(DE)]
Range of DE is between:
10^[LDE + SD] = 10^[mean LDE] * 10^[SD]
10^[LDE - SD] = 10^[mean LDE] * 10^[-SD]
| A supplemental approach to analysis and presentation using Z3 is to generate a composite gel image for each experimental condition, then to overlay the two composite images. Proteins induced in gel 2 appear pink, whereas proteins repressed appear green. However, the individual gel pairs still need to be checked, because a protein appearing in only one of three replicate cultures can look strong in the layered composite. In the future, Compugen plans to refine this program so as to calculate mean induction and repression ratios as well as error values directly from layered composite images. [Note: Preliminary results shown, not for publication.] | 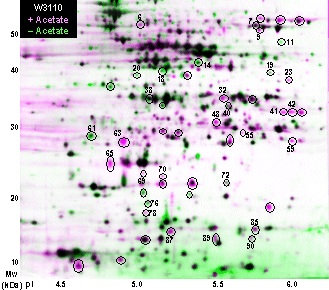 |